When ordering on the site, customers often abandon the registration form—the entry barrier is high. According to our project data, standard registration with 5-8 fields converts only 30-50% of the time. Telegram authorization reduces drop-offs by 25% and speeds up login to one click. A seamless integration of the Telegram Login Widget into 1C-Bitrix solves this problem. It relies on the official Telegram mechanism using HMAC-SHA256. We have implemented over 50 such integrations, and each passed load testing. Below are the technical details.
How does the Telegram Login Widget work?
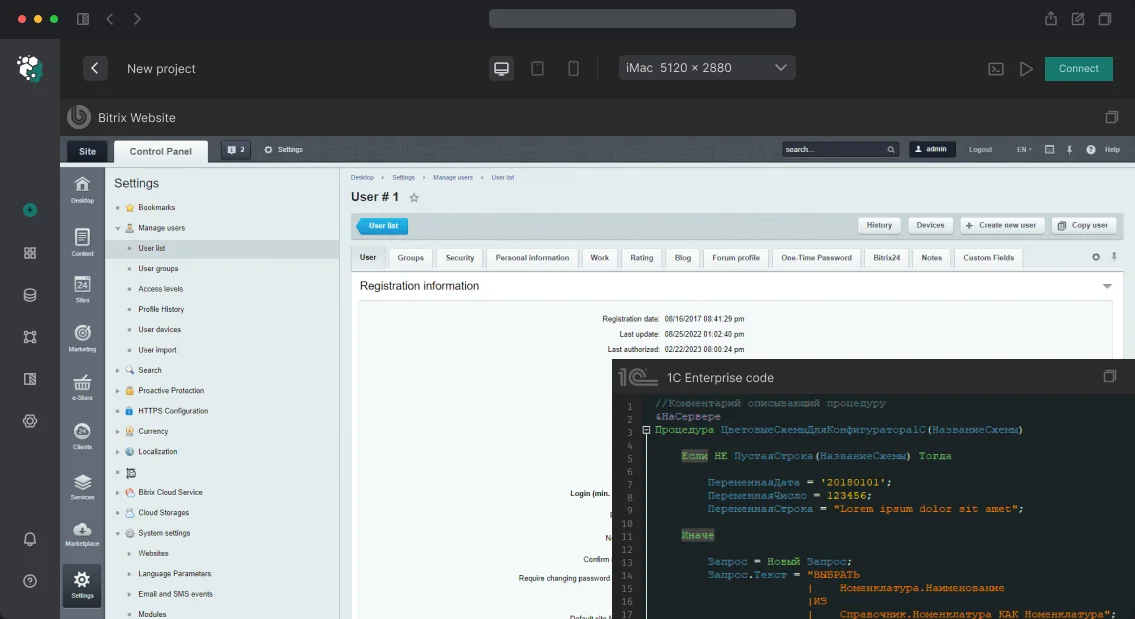
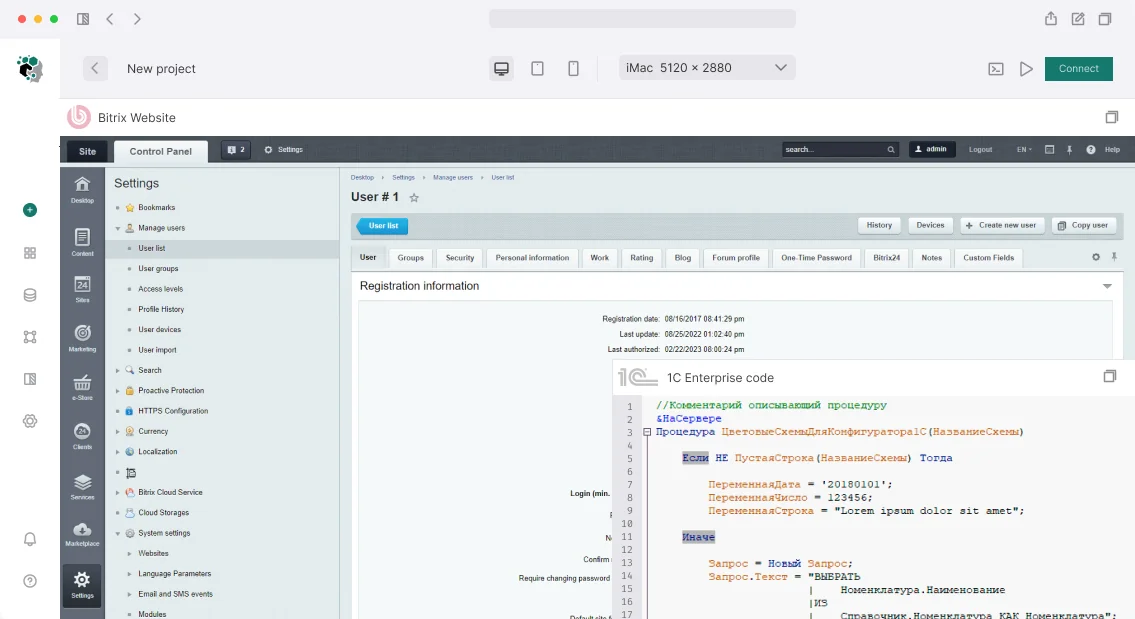
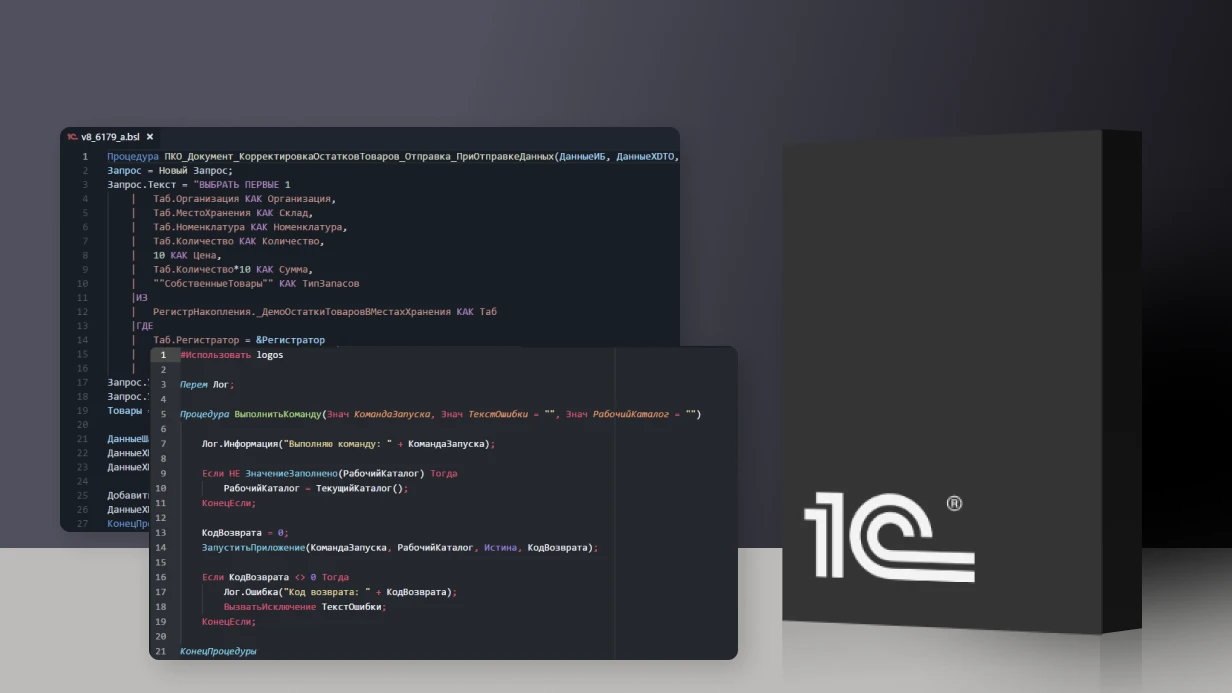
The Telegram Login Widget is an official Telegram mechanism for authorization on third-party sites. Unlike OAuth providers (VKontakte, Google), it uses its own protocol: user data is passed via an HMAC-SHA256 hash with a key derived from the bot token. In 1C-Bitrix, there is no standard module for Telegram authorization, so integration is done manually or through a third-party module.
- Place the Telegram widget on the login page (script
telegram.org/js/telegram-widget.js).
- The user clicks the button, confirms in the Telegram app that they trust the site.
- Telegram sends to the callback URL (or JS callback) an object with fields:
id, first_name, last_name, username, photo_url, auth_date, hash.
- The server verifies the signature: builds a
data-check-string from all fields except hash, computes HMAC-SHA256 with key SHA256(bot_token), and compares it with hash.
- Checks
auth_date — not older than 86400 seconds (protection against replay attacks).
- After verification, authorizes or registers the user.
$bot_token = '123456:ABC-DEF1234ghIkl-zyx57W2v1u123ew11';
$secret = hash('sha256', $bot_token, true);
$data_check_string = ...; // sort and concatenate all fields
$hash = hash_hmac('sha256', $data_check_string, $secret);
if (hash_equals($hash, $_GET['hash'])) { /* ok */ }
Why Telegram authorization is better than a standard form?
| Criteria |
Standard Registration |
Telegram Authorization |
| Login time |
30-60 seconds |
2-3 seconds |
| Number of fields |
5-8 |
0 (one click) |
| Bot protection |
CAPTCHA |
Built-in Telegram check |
| Completion rate |
30-50% |
80-95% |
| Support costs |
High (password resets) |
Reduced by 40% |
Telegram authorization is 10-30 times faster than a standard form and reduces support load by 40%: users don't lose passwords or create tickets. A 25% reduction in drop-offs is confirmed by the practice of our projects.
Typical technical difficulties during setup
- "Bot domain invalid" error — occurs if the domain is not set in @BotFather. Solution: use
/setdomain to specify the site domain.
- "Hash invalid" error — incorrect signature or extra fields in the request. Check the field order, use
hash_equals for comparison.
- Widget not displayed — no SSL or script blocked. Install HTTPS, allow script loading from
telegram.org.
- User not found — user field
UF_TELEGRAM_ID not created. Create through admin panel or migration.
Case study: online store with 50,000 users
The client complained about a high rate of abandoned carts due to complex registration. We implemented Telegram authorization in 4 hours: created a bot, developed a custom component with callback handler, added a user field. Result: registration drop-offs decreased by 40%, the number of support requests for password recovery dropped by 60%. Stack: 1C-Bitrix (PHP 8.1, infoblocks v2.0), MySQL, Telegram API, component 2.0.
What is included in the work?
| Stage |
Duration |
Description |
| System audit |
from 30 min |
Check current architecture, entry points, caching |
| Bot creation |
from 15 min |
Via @BotFather, domain binding, token retrieval |
| Component development |
from 2 hours |
Custom component with HMAC-SHA256 check and callback handling |
| Field creation |
from 20 min |
User field UF_TELEGRAM_ID, mapping setup |
| Integration |
from 1 hour |
Binding to existing accounts, roles, business processes |
| Testing |
from 1 hour |
Load testing, mobile devices, security check |
| Documentation |
from 30 min |
Schema, configs, maintenance instructions |
Checklist before launch
- [ ] Domain set in @BotFather (
/setdomain)
- [ ] Site runs on HTTPS with valid certificate
- [ ] Bot token stored only on server, not on frontend
- [ ] User field
UF_TELEGRAM_ID created (type "Integer")
- [ ] Signature verified via
hash_equals and auth_date time
- [ ] Widget not blocked by AdBlock or corporate policies
Timeline
Turnkey implementation of Telegram authorization: 4–6 hours. The timeline may be adjusted for complex modifications (CRM connection, business processes). We will estimate your project for free — contact us for a consultation. Order authorization setup, and your users will forget about passwords.
Our experience
For more than 10 years we have been working with 1C-Bitrix and Bitrix24. Every project undergoes code review and load testing. The Telegram Login Widget Documentation confirms the correctness of our approach.
Open Lines: Where It All Begins and Breaks
The Open Lines module (imopenlines) is the standard Bitrix24 mechanism for omnichannel communications. It connects an external channel to an internal chat via the Im\Model\ChatTable entity. The problem is that out-of-the-box routing settings are primitive: "in turn" or "all at once." For a real sales department with 15+ managers, VIP clients, and SLA response times, this is not enough. We enhance routing via event handlers OnImOpenLinesChatStart and the REST API.
A manager switching between five windows loses messages, forgets to reply—the client leaves for a competitor who responded in 30 seconds. Bitrix24 messenger configuration gathers all channels into one interface, and CRM records every touch. Experience shows that after setup, average first response time drops by 40% within the first week.
How we implement messenger integration
We connect Telegram, WhatsApp, Viber, VK, online chat, email, and other channels via standard connectors or REST API. Each channel requires its own configuration, but the result is unified—all messages end up in open lines, and from there into the client card. We guarantee no message gets lost: we use tagged caching and agents to check queues.
How to connect WhatsApp to Bitrix24?
WhatsApp is the main business channel. Integration via WhatsApp Business API with a verified account. We configure sending and receiving messages from the Bitrix24 interface—they fall into an open line. We create HSM templates for initiating dialog (abandoned cart reminders, order status). Templates go through Meta moderation—allow 2-3 days. We ensure file, image, and document transfer. We link conversations to contacts and deals via CRM_ENTITY_TYPE and CRM_ENTITY_ID.
| Method |
Nuances |
Payment Model |
| WhatsApp Business API (Cloud) |
Verification via Meta Business, templates, bulk messaging |
Per conversation window (24h) |
| Provider (Edna, Wazzup, Chat2Desk) |
Quick start, intermediary service, own limits |
Subscription fee |
| Bitrix24 CRM Marketing |
Built-in integration, minimal setup |
Included in Professional+ tariff |
Telegram: Free Channel with High Reach
Telegram Bot API is free and well-documented—a pleasant rarity among messengers. Integration into Bitrix24 is done via the imopenlines connector. Setup: connect the bot to open lines, configure the connector to Telegram. Receiving messages, photos, videos, documents—all mapped to the Bitrix24 chat. Inline buttons and reply keyboards for navigation. Webhook on https://yourdomain/rest/imconnector.register—register the connector. CRM integration: incoming message creates a lead via crm.lead.add or an activity in the deal.
Telegram is indispensable for:
- Support via bot—standard questions resolved without an operator (up to 70% of inquiries).
- Notifications: orders, delivery, payment—via Telegram Bot API sendMessage.
- Lead collection: bot asks qualifying questions → creates a lead.
Viber and VK: Audience 35+ and Social Network
Viber maintains positions in regions. We connect a business account via the open lines connector. We use Viber Business Messages—bulk messaging with action buttons and rich content. Receiving and sending from CRM works immediately.
VK (Vkontakte) is the largest social network in Russia. Integration via the imopenlines community messages connector. Process messages and comments from a single interface. Auto-creation of a lead—handler OnImOpenLinesCrmCreate. Integration with VK Ads for tracking sources via UTM. Bot for auto-replies—VK Bot API + Callback API.
Why is proper routing of inquiries important?
Distribution of inquiries among operators is organized through queue mechanisms. By default: "who is free." In reality, more complexity is needed:
- Determining responsible person by number or email from CRM—
im.chat.get + search via crm.contact.list.
- Distribution by departments based on keywords (NLP classifier or simple regex on first message).
- Priority queue for VIP—by segment in CRM.
- Escalation on 5-minute timeout—auto-switch to next.
- Transition to call directly from chat—
telephony.externalcall.register.
We use custom event handlers OnImOpenLinesChatStart and REST API to implement such scenarios. Additionally, we connect Bizproc for complex approval chains and integration with HL blocks for storing custom queue parameters. Result: client does not wait, operator is not overloaded.
What is included in messenger integration work
| Component |
Description |
| Audit of current CRM structure |
Analysis of inquiry types, channels, operator load |
| Connecting channels |
Configuration of WhatsApp, Telegram, Viber, VK, email, online chat connectors |
| Routing setup |
Queues, distribution by competence, escalations, SLA |
| Chatbot development |
Script-based or with NLP, integration with CRM and external APIs |
| Operator training |
Documentation, video instruction recording, webinar |
| Testing and support |
Running all scenarios, 2-week monitoring after launch |
| 6-month warranty |
Free bug fixes, consultations |
Chatbots: Script-Based and with NLP
Types
Script-based (rule-based): button menu, decision tree. "How to pay" → "Where is my order" → "Business hours." Transfer to operator at intent == 'unknown' → transfer_to_queue. Reliable, predictable, covers 60-70% of typical inquiries.
With NLP: free text in Russian. Intent detection (buy, complain, inquire about delivery), entity extraction (name, date, order number). Contextual dialog—remembers what was discussed. Implemented on Rasa or Dialogflow, integrated with Bitrix24 via REST.
Example handler code for a script-based bot (PHP)
use Bitrix\Main\Loader;
use Bitrix\Imopenlines\Model\SessionTable;

Loader::includeModule('imopenlines');

$eventManager = \Bitrix\Main\EventManager::getInstance();
$eventManager->addEventHandler('imopenlines', 'OnImOpenLinesMessageReceive', function($event) {
    $message = $event->getParameter('message');
    $chatId = $event->getParameter('chatId');

    if (preg_match('/order status (\d+)/i', $message, $matches)) {
        $orderId = $matches[1];
        // Get order status via API
        $order = \Bitrix\Sale\Order::load($orderId);
        if ($order) {
            $status = $order->getField('STATUS_ID');
            \Bitrix\ImOpenLines\Chat::sendMessage($chatId, 'Your order #' . $orderId . ' status: ' . $status);
        }
    }
});
Scenarios and Real Impact
| Scenario |
Action |
Operator Relief |
| FAQ |
Answers from knowledge base based on intent match |
30-50% |
| Order status |
Request sale.order.get by number |
15-25% |
| Booking |
Date/specialist selection, creation via API |
20-30% |
| Calculation |
Preliminary estimate based on parameters |
10-20% |
| Lead qualification |
Data collection → crm.lead.add |
3x funnel acceleration |
| NPS/CSAT |
Rating after service |
100% automatic collection |
Comparison: a script-based bot processes requests 5 times faster than an operator, and an NLP bot reduces fallback rate to 15% after training on real dialogs. Average savings on operator salary when implementing a chatbot amount to substantial monthly savings.
How can chatbots transform your customer support?
Development Process
- Inquiry analysis—export history from open lines, cluster by topic. Identify 80% of typical requests.
- Dialog design—map on miro/figma. Each branch ends either with an answer or transfer to operator.
- Development—logic, integration with CRM and external APIs. For script-based: finite state machine. For NLP: pipeline: tokenizer → featurizer → classifier → response selector.
- NLP training—on real dialogs (at least 500 examples). Set confidence threshold.
- Testing—run all branches, edge cases (empty message, sticker, voice).
- Optimization—monitor fallback rate, retrain on new dialogs every 2 weeks.
Timeline
| Task |
Duration |
| Single messenger connection |
1-2 days |
| Open lines setup |
2-3 days |
| Script-based bot (basic) |
1-2 weeks |
| Bot with NLP |
3-6 weeks |
| Comprehensive omnichannel system |
4-8 weeks |
Result: all communications in one window, routine automated, no message lost. Managers sell, not search for the right chat. Evaluate which channels you need—contact us, we'll select for your niche. Get a personalized timeline and cost estimate for your project.